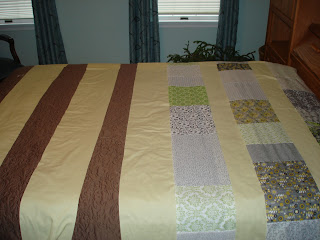
This summer I decided that I wanted to do a sewing project since I’d be living at home and I could use my mom’s sewing machine. I am by no means a pro at sewing, so I wanted to pick a project I knew I could do and one that wouldn’t take me forever to finish because I know that I get bored and not finish. As all of you know I did not get to a sewing project over the summer, but I did manage to pick something out. Now that J and I both have jobs we’ve been apartment hunting and think we’ve found something, so I decided I needed to make this project a reality and quickly!
I decided in the end that a duvet cover would be my project. Over the summer I’ve been following so many home decorating blogs and I feel so inspired. Unfortunately for us, most apartments we’ve looked at do not allow you to paint the walls. What you end up with is a cold feeling white (or really a yellowish-white) room. Our current comforter is black and white, which just adds to the bleakness of the room. Here is what our old apartment bedroom looked like (please ignore the disarray of the room in this picture, I think we were starting to pack things up for moving:
See the comforter does nothing for our room at all. What I really would like is a way to add a punch of color in the room through the room décor. The easiest thing would be to buy a new bedding set that has the colors I want, but the bedding in the picture above is only a year old, so I can’t really justify buying a new set, nor do I really want to. Thus the project idea came up of making a duvet, this way I can update the colors but keep the same comforter.
In my searching I found two ideas that I absolutely loved. The first can be found here and the second can be found here. After thinking about it for a while I decided to make the first duvet cover, but using the colors from the second one.
 |
| Color Palette |
I decided to compromise and create the first duvet idea with the colors from the second. It took me a while and trips to a few stores before I found enough fabric that I liked together (19 different patterns is hard to find when you limit your colors) and still I feel my end result could have been more cohesive but I’m content with how it turned out.
I followed the pattern exactly for the front part of the duvet so if you are interested in making this yourself then check out the link above. I definitely recommend rearranging your pieces multiple times until you find your favorite combination.
Now here is where what I did differs from the pattern above. The backside above calls for you to make additional strips, but my mom recommending simplifying the project by purchasing a king size sheet (my bed is a queen) and sewing my panel to the sheet. Well, in my search for sheets I found a clearance duvet that I loved and I had 20% off (Sweet!). Now you’re probably thinking, Wait did she get rid of all of the work she already put into the duvet? Nope, I decided to make a double-sided duvet! Why not get double the use out of it?
So here is what I did:
1. On the purchased duvet I ripped apart the seams and kept the side that I wanted to be on the other face of my duvet to the side.
2. I then used the other part of the purchased duvet and pinned my sewed duvet panel on top of it (Front to back). I did this as to make sure that it was big enough, straight and it helped to make some of my fabric less see-through. This turned out to be a good idea for me because I ended up having to add some length and width to the panel I created.
3. Next I sewed the two pinned panels together using the spots where I could see the seam ripped out as a guide for how much of an edge to give the two pieces. I also made sure to not sew over the buttons/button holes so I could just use the ones from the purchased panel instead of having to do it on my own.
4. Then I sewed my two final two panels together (face to face) and made sure to NOT sew the end with the buttons/button holes shut.
5. Next I sewed ribbon to the corners. This is so I could tie the corners of comforter in place (and the comforter would not shift around inside the duvet). This is Step 8 if you need further instructions.
Now you can turn the duvet so the correct sides are outside and the comforter is inside. Once you’ve done this button the end and you are done!
Here are what my two different finished looks are:
AND
I hope that wasn’t too incredibly confusing. Feel free to ask if you have any questions on how to do any part of the duvet!


No comments:
Post a Comment