Showing posts with label Decor. Show all posts

Wednesday, April 18, 2012

Colorado: Part 1, Beer-ster

So much has been going on lately its been hard to keep up with everything.  This past week was my school's spring break and right before we let out for break I was offered the opportunity to teach when we come back!  It is not a full-time gig, but I get to fill in, possibly until the end of the school year.  My nerves and excitement are through the roof!

Luckily I was able to push most of that away for our trip to Colorado!  J and I joined my parents on a trip out to see my brother who lives in Boulder.  J came out two days later than us so he missed out on the Easter celebrations at my brother's place.  My brother and his roommate have put on Beer-ster for a couple of years, a fun Easter celebration for all of their friends who couldn't go home to their families for the Holiday.  However, this celebration was a little less family-friendly event as its name would imply.  There was a mimosa bar, amazing decorations (done by my brother's roommate's girlfriend!), beer bottles decorated with Easter themes, a Easter-beer hunt and many fun games.

Doesn't it look straight out a Martha Stewart project?


Homemade pinwheels
Yes that is a pony!
Playing cornhole
I will fill you in on the rest of our Colorado trip next time!

Wednesday, February 29, 2012

Leaping from the Weekend to Midweek


Happy Leap Day everyone!  I hope your extra day of the year is treating you well.  The weather here isn’t that pleasant, raining and gloomy.  We’re expected to get nearly 1.5 inches of rain today!   It has me wishing that we were back to last weekend, despite the high winds.  I’ll take wind over rain any day!

Over the weekend J and I wanted to take advantage of both of us having the day off from work.  We decided to take a day trip into Philadelphia, but didn’t know what to do.  We knew it was going to be windy so we decided to find somewhere we could be indoors for a while.  Initially we were going to head over to the Franklin Institute for their dinosaur exhibit, but after looking at the prices to go (there were separate costs to enter the museum and then the exhibit!) we decided that it was too expensive.  So we opted to a less educational spot and off to IKEA we went!

We left the apartment to a crazy flurry!  It was awesome, but then half-way down the street it became misting and then all of a sudden it was all gone!


J and I had fun walking through and thinking of ideas for our house one day.  I could spend all day in IKEA if you let me!  Unfortunately for us the store was in transition with their winter and spring displays so there were a lot of empty areas, which are usually filled with fun goodies.  We ended up purchasing a set of wine glasses (only $4.99 for 6), 2 wooden cutting boards, and a bookcase/table to put in our entryway.


Our stomachs were rumbling as we left the store so we ventured over to Reading Terminal Market to get some lunch and see if there were any yummy goodies to bring home with us.  After walking around for a bit J and I ended up getting cheese steaks (his steak and mine chicken) at By Georges.  They were delicious, not overly greasy and just the right amount of cheese.  We both only managed to eat half of our meals and brought the rest home with us (we later decided to just eat our leftovers for dinner instead of cooking).


Afterwards we walked around deciding if we wanted to purchase some seafood, meat, or fresh produce home with us.  This market has the biggest shrimp J and I have ever seen!  In the end we did not bring any groceries home with us, but stopped for ice cream on our way out.  We bought ice cream at Bassetts: J had a creamsicle shake and I had a grasshopper shake.  MMmm.


After arriving home J and I decided to go right into putting our new entryway table together.  The piece did unfortunately have a couple nicks here or there, but we managed to piece it together so that those edges would be against the wall.  Now all we need is better wall décor and a basket to throw our keys in.

In the end we hadn’t really done much over the course of the day, but it felt like the perfect Saturday.

Friday, February 3, 2012

DIY: Decorated Vases, Jars, Etc..


It is unfortunate that while we’re getting warmer weather here in NJ, I’m developing a bit of a cold.  I started with the sniffles Monday, but Tuesday it was a full-fledged cold and even now I’m not feeling much better.  Unfortunately since I get paid per diem I’ve had to go to work each day even though I’d rather be in bed all day.  It is a good thing then that I finished 
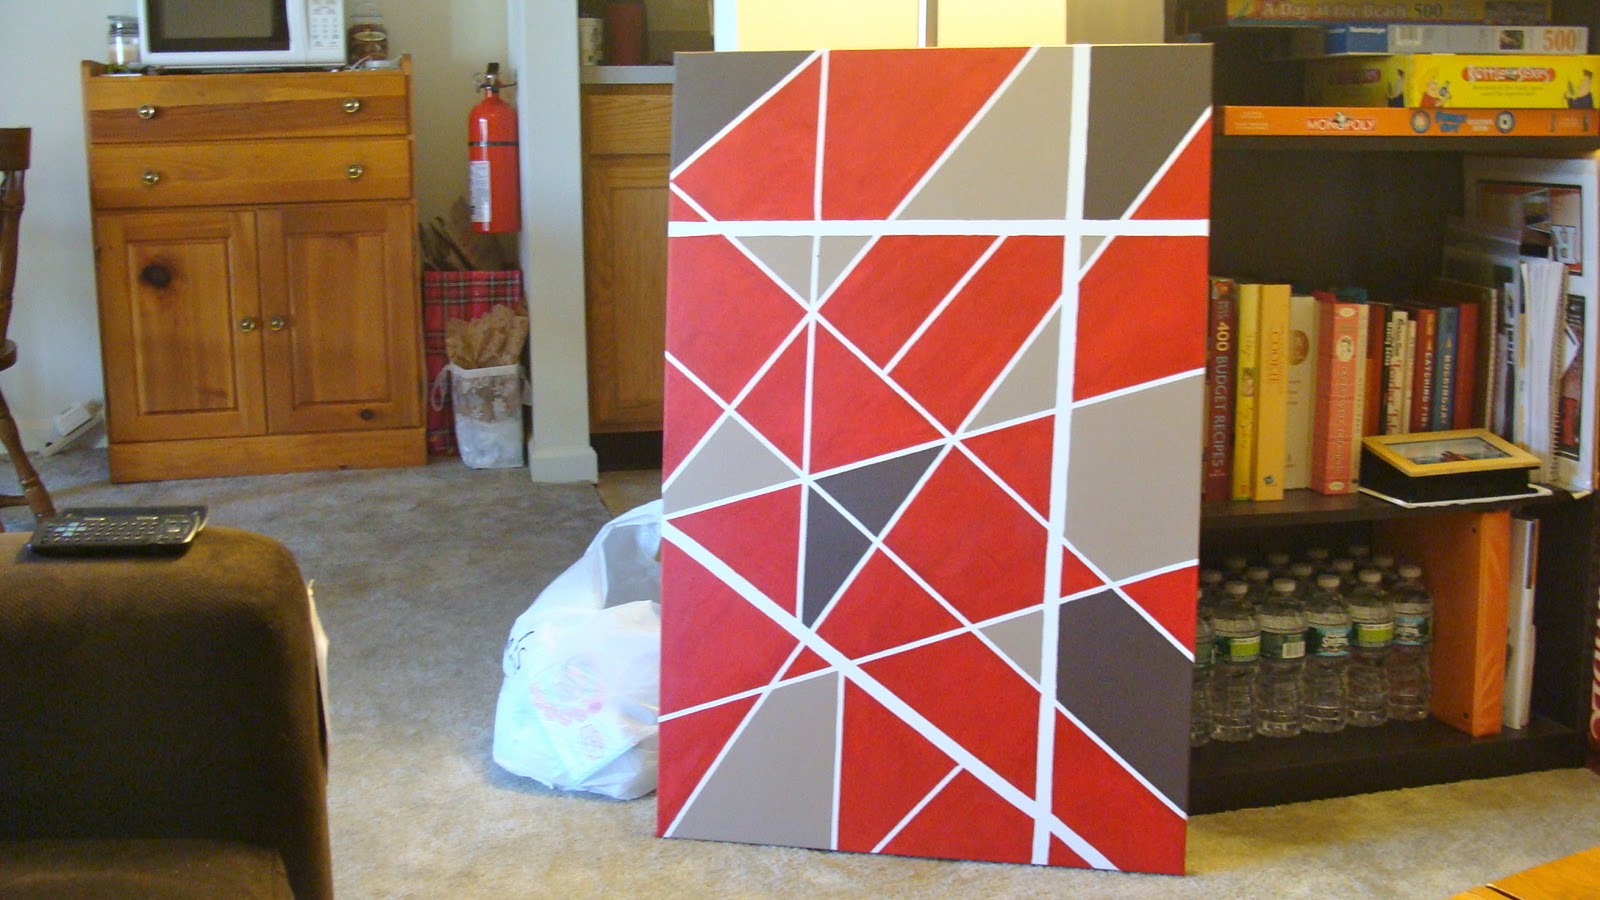
my wall art décor this past weekend and another fun DIY to match my wall art since I haven’t accomplished much of anything this week.

This DIY idea was something I came across while seeing what was on sale at Michaels this past weekend.  I saw a link to a Martha Stewart project.  This cute vase was something that looked simple enough to do and required many of the same products that I was already purchasing for the wall art.  My intention was to only buy one vase, but at only $2.50 a piece I decided a second vase and a jar would be a good addition to my purchase.

In the end I purchased the following (Items from my wall art decor project are also in this image):
-2 Vases
-1 Jar
-Paint (same paints I used for my last project)
-Quilters and Electrical tape (1/4” and ¾” respectively) *Side Note: I wanted to purchase painters tape but could not find it in ¼” length
-Same sponge brushes as my wall art project just cleaned and dried from previous use
-Fake daisies (Especially since the vase I was going to put them in was going in our bathroom which gets no sunlight during the day, fake seemed the way to go)

First things first, make sure to wash and clean the vases and jar with soap and let them dry thoroughly.  My acrylic paint also said to wash the glass with alcohol, but I skipped this step (it probably would've helped a bit more as I was removing the tape because some of the paint started to come up with the tape).  

As with my wall art project, this requires you to tape the glass up before you paint.  I recommend you really think about what design you want on the item you are painting.  The more you criss-cross the tape on the glass, the tougher it can be for clean lines to appear on the glass.  That being said don't be afraid to experiment with different designs!


My recommendation is that if you are doing a couple of pieces like I did, that you only work with items that are using the same color at the same time.  Working with too much paint can cause accidents when painting and also requires fewer paint brushes and palates to work with.


I did three layers for all of the colors I used in order to make them totally opaque (the red I almost considered a fourth layer, but when the paint dried after the third I was happy with how it looked).  I let the paint dry until it was dry to touch before taking the tape off.  I only had a few problems where  the paint tried to come up with the tape, mostly with the tiny stripes that I made. 


What I love about these is that they now match other things that are in the same room without being overly matching.  I put the fake daises in the vase meant for the bathroom and I will fill the jar with ear cleaners when I get a chance.  As for the red vase for our living room, I put our tv remotes in it so we don't have to worry about searching for them anymore.


I absolutely love how these turned out!  If you try this yourself please leave a comment with pictures of your work!!

Wednesday, February 1, 2012

DIY: Wall Art Decor


As I’ve said before, J and I decided it would be a pain to paint our apartment walls only to have to possibly paint them back to a boring white color when we move.  I was browsing through pinterest.com pages when I found this awesome, easy way to add a pop of color to the room.

This weekend I bought all of the supplies:
·      a 24x36 canvas (for only $10 with the store’s sale and a 20% off coupon!)
·      a 16x20 canvas (couldn’t pass up a good deal!)
·      paint (for the larger canvas: for the smaller canvas:)
·      three small sponge brushes and one large sponge brush
·      I couldn’t find ¼” painters tape so I bought ¼” quilter’s tape and ¾” electrical tape.

I promise this project is minimally messy and pretty quick.  If you want to follow thenewdomestic.com’s method then you will first need to create a mock version of your painting.  Instead of doing this I just haphazardly put tape down on my canvas.  (*Note: If you decide to use electrical tape make sure to really press it down into the canvas as it will peel up a little if you don’t and you will not end up with totally clean lines.)

I also chose not to pre-decide where I wanted each color to go.  I just knew that with the larger canvas I wanted red to be the main color and on the smaller canvas dark blue would be more present.  I used a Tupperware containers and a lid as a palette and worked on the smaller canvas first. 


Like I said before I did not plan out which sections would be what color.  As I went I would just think that an area looked like it was too much dark blue and needed a splash of light blue.  I did the same with my larger canvas, but I also knew that the color I wanted the least of was the dark brown because I didn’t want the painting to make the room look dark.   I painted 2-3 coats of each color because some needed the extra layer to look the way I wanted it to be.


My paint directed that I wait 1 hour between layers of paint, but to be honest it was pretty dry after 10 minutes so I just went on to the next layers when it was dry to touch.  I waited about 5-10 minutes after the last layer before peeling off the strips of tape.  Make sure to pull the tape in order (some of mine overlapped) otherwise you could ruin some of your straight lines if your paint is not totally dry!


I let both canvases dry overnight before attempting to hang them (just so I wouldn’t accidentally get paint on the wall.  The paint brand that I purchased says it takes 21 days for the paint to cure so J and I decided that we would wait to hang up the canvas in the bathroom until then because the moisture from showering might cause it not to cure completely or make the paint run.  (That doesn’t mean I can’t take a picture to show you what it would look like!)  We did decide, however, that the large canvas could go up in the living/dining room without waiting for the paint to cure.


The nice things about the canvases that I purchased is that they are light and instead of hammering nails into the apartment walls, we just used thumbtacks to hold them up instead of possibly hammering nails into wiring in the walls.


Doesn't it add such a great punch of color to both rooms!?  What home decor have you created for a fraction of what it would've cost to purchase that item in a store?

Monday, January 30, 2012

Weekend Arts & Crafts

So this weekend was spent recuperating from the aforementioned never ending week.  Since J unfortunately had to work the whole weekend I thought I'd get some chores done.  Finishing the laundry was the furthest I got before boredom completely took over.

Image from thenewdomestic.com
J and I have been trying to save money grocery shopping, so we shop the circular, only buying certain things when they are on sale (i.e. Chobani yogurt, certain fruits, etc).  I grabbed our stack of shops' circulars and looked for the Shoprite one to start circling what we should get for the week, only to come across one for A.C. Moore first.  Like I talked about in my last post, the Wall Art Project from the New Domestic is a project I'd like to complete, but I was waiting until my next paycheck to purchase supplies.  Well, the supplies were on sale at A.C.Moore and canvases were half off so I decided to go ahead and get started on this project.


I may have gone overboard with the supplies I purchased (from Michaels as well), but I spent the rest of the weekend happily crafting and having a nice relaxing weekend.  I can't tell you how ecstatic I am with the results.  The two pieces of wall art I ultimately ended up making cost me under $30 and I used the remaining paint to create a couple other items for the apartment which were about $3-7 to make each.  Not too bad!


Later in the week I'll post a How-To on creating the wall art and containers that I made over the weekend.  Right now I've got to get some things done that I put off all weekend and then head to work!